Where to start… so back in High School I had an electronics teacher at Harbor High School named Dan White. He was a ham and talked about radio in class and gave us demonstrations of how he used radio. Even before that I used walkie talkies, and later CB Radio. Around that time I received my first scanner (Uniden Bearcat 200XLT) and a short wave radio. I monitored a lot, in every band I could get my hands on.
So I got my ham radio license and bought a dual band handheld, Kenwood TH-D7, and later a tri-band Kenwood TH-F6A and used them both for monitoring and occasionally talking on the VHF bands. But there was always a part of me that wanted to go back to the longer wavelengths and start hearing things from around the world. I love linked repeaters, but there is some kind of “ham radio purity” to hearing a voice from thousands of miles away without any internet backbone carrying it most of the way. Direct from his antenna to the ionosphere to my antenna… that’s just cool.
The Radio Choice
I like to research a lot before I make purchasing decisions, and with radio I knew I really needed to determine how I planned on using a radio so I could find the right one. Knowing I do enjoy listening more often than transmitting, overall power rating wasn’t as important to me for now. As I start transmitting more, I’m sure I will become more interested in higher power and better antennas, but as a start I was thinking a QRP (Low Power, typically under 5 watts) would do the trick just fine. The receive quality would be about the same as a more expensive, higher power radio.
I also wanted something portable and that I could easily operate off of battery power. Ellen and I enjoy hiking and backpacking, we travel frequently and I’d like to be able to bring the radio along and throw an antenna up in a tree and see who was out there.
Having a friend at Elecraft, I first started looking at the Elecraft KX1 ultra portable tranceiver. The thing is tiny, is a kit which I would enjoy building, has paddles and runs off batteries easily. With upgrades it can operate of four bands and have an antenna tuner build in. I’ve always been interested in learning morse code (CW) and it seemed like a good option.
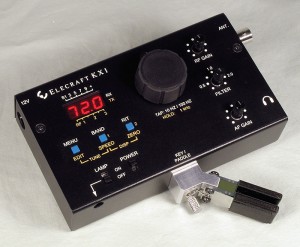
As I started looking at other radios, I added up the price of the KX1 kit, the modules for the other bands, the antenna tuner, and the paddles… and found I could get a larger radio that also offered phone (voice) operation on more bands for a comparable price. Some friends on Twitter also recommended a radio with more capability. Once I learn CW better, I have a feeling I will come back and look at the KX1 again, but this leads me to the radio I actually chose.
The Yaesu FT-817nd
One radio fitting my desires well was the FT817, it was relatively small, could run off of it’s internal batteries or easily be powered by external batteries. It covered the 2M and 70cm bands so I could use it on VHF without having to carry another radio. It covered 160 meters through 6 meters, had wide band receive, and could be computer controlled and programmed. It would allow me to use the digital modes which I’ve been interested in (PSK-31, RTTY) as well as CW.
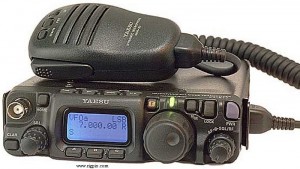
So I debated for quite a while if I really wanted to spend the money on a new radio or not, plus I started looking at all of the accessories I would want or need if I got it. But after a few months, and with Christmas coming, I started the groundwork on making it happen. My wife was going to help out and give it to me for Christmas. I had won a F6A at Pacificon in the raffle which I sold on eBay, so between that money and her portion of the gift it would be just perfect.
Accesories: The Elecraft T1 Antenna Tuner
The first accessory I ordered was the Elecraft T1 Antenna Tuner kit. It is a tuner that will work with any QRP HF radio, but was built with the FT-817 in mind. It has a cable that connects between the tuner and the radio and will retune based on which band you have set up in the 817 without the need of transmitting and retuning.
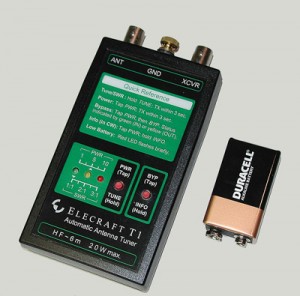
The kit was great, I had a rainy Saturday morning and put it together through the day. Had no radio to test it with yet, but all the lights blinked the way they were supposed to according to the manual. I did buy the radio cable with it just for ease of tuning as I jumped all over the bands when I would simply be monitoring but not transmitting. I was new enough to HF that I really didn’t know what bands would be interesting or useful to me, that was yet another reason I opted to go with this radio instead of the KX1 to start with.
Accesories: The DinKey
Knowing I really wanted to continue learning CW (Morse Code) I knew I was going to need a key or paddles. I was shopping around eBay and various websites and found what I believe is the perfect solution for this radio! The DinKey is tiny, it plugs right in to the microphone jack and works with the radios internal electronic keyer.
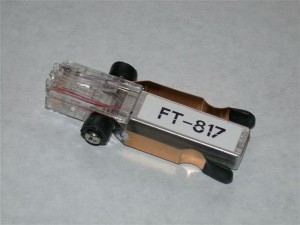
I received it quickly from the manufacturer and am extremely pleased with it. I just turned on the practice keyer and it felt great and I was easily able to send code as fast as I knew how… I won’t mention how poor my accuracy was but that has nothing to do with this excellent little product, and the price was perfect.
Accessories: The Antennas
So I was going to need an antenna… since I already had the Elecraft T1 Tuner, I only needed a random wire to do the trick. For portable operation having something that was end fed seemed an ideal instead of a typical dipole antenna. I knew I would end up building several antennas, but during my search I came across the PAR Electronics END-FEDZ Antennas. Looking at those, I went ahead and decided to spend the money and order one of their EF-10-20-40 meter antennas. They don’t need a tuner, looked like they were very high quality, and had great reviews on the ham radio websites. I have not yet received it, but am looking forward to it.
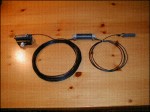
Since it was after Christmas and I already had the radio, I needed an antenna to play with right away so I jumped online and did some reasearch to see what kinds of wire I should try and what length would be most useful. I found this post on the Elecraft email list that had a list of antenna lengths that would be most useful on multiple bands. So I headed up to Radio shack and bought the supplies to build an antenna.
I’m a beginner here and did most of this on my own without following an example online, so I’m not saying this is a good or right way to do it, it’s just what I did for my first attempt. I decided to go with the 49.2 foot long length, so I picked up a spool of 60-Ft. UL-Recognized Hookup Wire (20AWG) and a UHF-to-Motorola-Type Scanner Adapter. What I did was measure out my 49.2 feet of wire, stripped one end the same length as the motorola connector that was visible. I slipped on three pieces of heat shrink tubing on to the wire, then did a nice long solder connection of the antenna wire to the adapter. I slipped down the smallest heat-shrink tubing and shrunk it in to place. Brought down the next smallest one and shrunk it over the first one. Then the last piece was just big enough to fit over the outside of the Motorola connector, so I shrunk it down over that and it connected tightly to the two previes pieces making a nice seal.
For the end, I didn’t want to tie any knots or build something complicated at the end, I wanted the antenna wire portion as straight and unmodified as possible. So I simply too a few inches of the remaining antenna wire, bent it in to a U shape, and used heat shrink to attach it to the antenna leaving a loop of insulated wire exposed at the end. Now I can tie it to a line and pull it up in to a tree as needed.
The antenna has worked just fine for me thus far, I have nothing to compare it to, but with the antenna tuner it seems to tune up just fine almost everywhere I have tried listening.
This post has gotten rather long, I’ve been meaning to sit down and write each step of the process but just never had the time, so now you get everything all in one post. If you have any questions feel free to add them to the comments. I’m new to all of this but I’ll be glad to tell you what I know. In the near future I expect I’ll have some more posts and questions as I listen more to HF, play with PSK-31, continue learning Morse Code, study for my General Class license and eventually make my first DX contacts on HF!


